A Marcher costume diary
m (Rafferty moved page A Marcher Costume diary to A Marcher costume diary without leaving a redirect) |
|||
| (38 intermediate revisions by 3 users not shown) | |||
| Line 1: | Line 1: | ||
[[Category:Costume]] | |||
=Costume Design for Larp= | =Costume Design for Larp= | ||
<br>Getting the right costume can be a crucial part of developing your character - not all of us have the luxury of commissioning a complete outfit from scratch, and assembling a new look from a mix of old and new kit can be a real challenge. Here's how I generally go about designing and assembling costume, using my work-in-progress Marcher musician as an example as I go. | <br>Getting the right costume can be a crucial part of developing your character - not all of us have the luxury of commissioning a complete outfit from scratch, and assembling a new look from a mix of old and new kit can be a real challenge. Here's how I generally go about designing and assembling costume, using my work-in-progress Marcher musician as an example as I go. | ||
==What sort of person is my character going to be?== | ==Part 1 - Design and Planning== | ||
===What sort of person is my character going to be?=== | |||
<br>Here's where you try and get a basic idea of the person you're going to portray. Are they rich or poor? Practical or fanciful? What do they like and dislike? What elements of the brief am I going to pick up on here? | <br>Here's where you try and get a basic idea of the person you're going to portray. Are they rich or poor? Practical or fanciful? What do they like and dislike? What elements of the brief am I going to pick up on here? | ||
<i><br>One of the fun things I liked about the Marches brief is its practicality - it's not that the people aren't well off, it's just that they see no reason to squander money on fripperies - in fact, there's a real reverse snobbery that I thought I could pick up on. I want this outfit to be understated and very plain, for the most part, with a few little details that make it stand out. I'm going to use a palette of mostly browns, greys and creams, with a few touches of brass and gold here and there.</i> | <i><br>One of the fun things I liked about the Marches brief is its practicality - it's not that the people aren't well off, it's just that they see no reason to squander money on fripperies - in fact, there's a real reverse snobbery that I thought I could pick up on. I want this outfit to be understated and very plain, for the most part, with a few little details that make it stand out. I'm going to use a palette of mostly browns, greys and creams, with a few touches of brass and gold here and there.</i> | ||
==What IC and OOC practical considerations do I need to take into account?== | ===What IC and OOC practical considerations do I need to take into account?=== | ||
<br>Most outfits need a pouch to carry your IC money; it's helpful to have another pouch or a hidden pocket to keep your OOC essentials, such as OOC money and spirit gum for running makeup repairs. | <br>Most outfits need a pouch to carry your IC money; it's helpful to have another pouch or a hidden pocket to keep your OOC essentials, such as OOC money and spirit gum for running makeup repairs. You can set yourself a budget here if you like...! | ||
<br><i>I'm considering using facial prosthetics for this character, so the neckholes are going to have to be reasonably wide to accomodate potential horns, and I might need to consider lacing down the front. | <br><i>I'm considering using facial prosthetics for this character, so the neckholes are going to have to be reasonably wide to accomodate potential horns, and I might need to consider lacing down the front. I'll tuck the skirts up when it's muddy. | ||
==What images from the media appeal to me that might help me with my design?== | I also really, really hate getting cold at events, so I want lots of layers that I can pile on at night.</i> | ||
===What images from the media appeal to me that might help me with my design?=== | |||
<br>Have a look at the internet - it's full of pictures from films and TV that might help you get an idea of how you might want your outfit to look. You don't have to copy them, but forming a mini "mood board" can help you get an idea of what you might like your costume to look like. | <br>Have a look at the internet - it's full of pictures from films and TV that might help you get an idea of how you might want your outfit to look. You don't have to copy them, but forming a mini "mood board" can help you get an idea of what you might like your costume to look like. | ||
| Line 25: | Line 28: | ||
</row-fluid> | </row-fluid> | ||
==Ready to scribble?== | ===Ready to scribble?=== | ||
<br>You don't need to be a great artist to draw a quick sketch, and you don't need to show it to anyone but yourself! If you find it difficult to get the proportions of figures right, [[http://www.alleycatscratch.com/ffashion/Figures.htm this]] webpage has templates you can print out and trace, then sketch the rough lines of your costume out over the top. | <br>You don't need to be a great artist to draw a quick sketch, and you don't need to show it to anyone but yourself! If you find it difficult to get the proportions of figures right, [[http://www.alleycatscratch.com/ffashion/Figures.htm this]] webpage has templates you can print out and trace, then sketch the rough lines of your costume out over the top. | ||
| Line 32: | Line 35: | ||
<i>Terrible, isn't it? Wax crayons clearly aren't my medium. However, you can make out the rough outlines of the design - a white headscarf, an ankle length dress with apron and front lacing, a belt, elbow length sleeves and a darker brown shoulder cover/partlet (which I'm not altogether convinced by, on looking at it, but it can be added or not at the end.) I think I might also add a very similar overdress/kirtle, but I'm confident enough that it'll look ok that I don't feel the need to draw another layer - though I might before the end.</i> | <i>Terrible, isn't it? Wax crayons clearly aren't my medium. However, you can make out the rough outlines of the design - a white headscarf, an ankle length dress with apron and front lacing, a belt, elbow length sleeves and a darker brown shoulder cover/partlet (which I'm not altogether convinced by, on looking at it, but it can be added or not at the end.) I think I might also add a very similar overdress/kirtle, but I'm confident enough that it'll look ok that I don't feel the need to draw another layer - though I might before the end.</i> | ||
==What have I got already?== | ===Breakdown - Layer by layer=== | ||
So, I'm now fairly confident that I know what I want my outfit to look like. Layer by layer, I'm going to wear: | |||
*a white cotton or linen long sleeved smock (I have a short sleeved one that'll do at a pinch). I might make a couple of these as they'll get pretty sweaty in use, and it'd be nice to have a fresh one each day at the event. They also keep my outer layers from getting stinky. | |||
*a brown wool kirtle. I think I'll line this, for neatness and durability, but I'll use lightweight cotton for the lining to stop it being too hot. Elbow length sleeves and pin-on ones for cold nights. | |||
*a slightly different shade of brown wool over-kirtle - I'll make this one a bit baggier and not bother with a front closure. This may cause problems if I have outsize horns, but I think two layers of centre front lacing, one over the other, might be a bit clumsy. I'll line this in wool for warmth, I think. | |||
*I'm considering a dark brown wool cloak, possibly lined in polar fleece, with fur trim around the collar. | |||
*A pair of short hose (possibly in red wool) | |||
*Belt, with accessories | |||
*Headscarf and apron, possibly a hood as well, but I'll come to that at the end (and once I've decided on horns/no horns) | |||
===What have I got already?=== | |||
You can have a look through your kit stash and see if there's anything you can use - in fact, sometimes you can base a whole costume around a really great bit of kit that you have already. What do I need? Always worth a rummage in your local charity shop. | You can have a look through your kit stash and see if there's anything you can use - in fact, sometimes you can base a whole costume around a really great bit of kit that you have already. What do I need? Always worth a rummage in your local charity shop. | ||
===Accessories=== | ====Accessories==== | ||
<i>Despite having a huge pile of junk in my house, this costume is much more understated than | <i>Despite having a huge pile of junk in my house, this costume is much more understated than the kind I usually go for, so I'm a bit worried that I won't have anything that'll work. However, a quick rummage shows up a wooden cup, a brown leather belt, a pouch and a big ring of brass keys, which all work with the look I'm going for. With this costume in mind, I also picked up a couple of linen tablemat type things from Oxfam for the princely sum of £2 and £4, which will be my apron and headscarf. I've got my medieval boots, which I might dye or beeswax to a co-ordinating colour (but I'll save that for the end). I also have my trusty coyote fur, which I got from [http://www.houseofdeclifford.co.uk House of DeClifford] and which is presently on a different cloak.</i> | ||
[[File:Dress5.jpg|200px|thumb|left]] | [[File:Dress5.jpg|200px|thumb|left]] | ||
====Fabric and materials ==== | |||
<i>I've got three metres of some heavyweight homespun looking wool (charity shop, £10), which will do nicely for the overkirtle. I've also got about 8m of cotton calico leftover from other projects which will line the kirtle nicely. Brown thread, check. Packet of eyelets for the front, check.</i> | |||
===So what do I need?=== | |||
====Fabric==== | |||
For the kirtle, I'll need 3m of wool -- a quick call to [[http://history-explorer.co.uk/ Ceolred Monger]] furnished me with 8m of lovely brown wool herringbone (£5 per metre)- lightweight and with a great stretch across the bias. Why 8m I hear you ask? Well, the first three metres is for making into my dress. The second 5m is for lining the overkirtle for coziness, but I want to machine wash it (and dye it) so that it felts up, and you lose a lot of length doing that. (2 packets of Dylon later, and it's a subtly different brown, but it does look like a different fabric, which I wanted - I don't want to be too "matchy" across the layers). | |||
<p>If I make the cloak, I'll need between 3 and 6 metres of heavy wool coating in brown, and possibly the same amount of polar fleece. Yes, it's not an historically accurate fabric, but like I said, I really, really hate being cold at events, and nothing compares to a polar fleece lining for staying warm. | |||
==Part 2- Making it== | |||
When it comes to making your gear, you'll have to decide whether to use patterns or not. For the early medieval period, lots and lots of garments were constructed out of squares and triangles, and with a measuring tape and a sense of adventure you can make tunics, trousers, cloaks and surcotes without needing a pattern. For more fitted garments, either for a later period or for more fantasy inspired creations, patterns can go a long way towards making your job a lot easier. | |||
===Sewing with Commerical Patterns=== | |||
Commercial patterns are readily available online and in sewing shops, and have the advantage of being generally quite simple to follow, well illustrated and fairly clearly explained. Some of them can be a bit 'costumey', in the sense that they'll make something that's all right to wear once or twice to a party, but might prove uncomfortable or flimsy with repeated use. I prefer my kit to be more durable and feel like something that my character could wear day-to-day (or at least regularly), so a bit of careful selection is needed when choosing a pattern like this. Many brands, such as [http://www.simplicity.com/c-164-costumes.aspx Simplicity], [http://mccallpattern.mccall.com/costumes-pages-105.php McCall's][http://butterick.mccall.com/costumes-pages-384.php Butterick] and [http://www.burdastyle.com/pattern_store/patterns?creator=6&most_recent=1&pattern_garment_type=6 Burda] have specific lines dedicated to costuming for cosplay and Renaissance faires which can be very handy. Be warned though -these patterns run very large, and assume that you're 5 ft 6 and (if a woman) a B cup, so you might well want to make a trial run in cheap sheeting before you cut your expensive fabric. The sizes they use are not the same as "ready to wear clothes", so always measure yourself and get the size that corresponds to your measurements. You might also want to consider changing a zip (if the pattern calls for it) for lacing - partly because it looks more "coolthentic" in many cases, but partly because zips can catch or jam in a field, rendering the whole garment unwearable - disastrous if you haven't brought a spare. | |||
Finally - a word of caution - these companies have a pretty wide definition of what counts as medieval. Don't trust their research - decide what you want to look like and find a pattern to match. | |||
===Specialist Historical Patterns=== | |||
By contrast, specialist historical patterns by the likes of [http://store.reconstructinghistory.com/historic-patterns.html Reconstructing History] or [http://www.classhistory.co.uk/Herts%20Fabrics/store/index.php?route=product/category&path=48_49 Authentic Patterns] are usually brilliantly researched and period appropriate. They might not be as easy, though, might need you to use more specialist sewing techniques and sometimes the pattern pieces don't fit together very intuitively. They may also be shaped to fit a body moulded by foundation garments of the period (which you can usually get a pattern for, you just need to build your costume from the body out). You won't usually have to adapt them much, though, and if you're a reasonably confident sewer they can be a brilliant starting point. They are usually a bit more expensive than commercial ones, but are printed on thick paper rather than tissue, which makes them very re-usable. You won't generally get them in sewing shops, though, so you'll have to get them online or at re-enactment fairs. | |||
===Pattern Books=== | |||
If you're going to be doing a lot of sewing, getting a few books with scalable patterns can be a good investment. The Medieval Tailor's Assistant is a fantastic book which I heartily recommend to anyone interested in making their own costume, and available [http://www.amazon.co.uk/The-Medieval-Tailors-Assistant-1200-1500/dp/0903585324/ref=sr_1_1?ie=UTF8&qid=1354316283&sr=8-1 on Amazon] amongst other places. There's nothing to stop even a beginner using the techniques described - it looks daunting at first but everything is broken down step by step, so if you're feeling brave jump in and see how you get on. | |||
===Kirtle=== | |||
<i>I drafted my own pattern for the kirtle, partly using the techinque described in [http://www.amazon.co.uk/The-Medieval-Tailors-Assistant-1200-1500/dp/0903585324 The Medieval Tailor's Assistant]. It consists of four pieces for the body, and two elbow length sleeve pieces. Because I was machine sewing, though, I used a victorian technique for the lining which is described [http://www.theweebsite.com/cotelande/kirtle/index.html here]- it's a bit tricky to get your head round at first, but once you get going it works very well. Given that it was the first time I'd tried it, I'm very, very pleased with the results - the lining matches perfectly and is secured at every seam. I then lined the sleeves separately, and faced the neckline and the hem by hand using bias strips cut from the wool. | |||
[[File:Frock0.jpg|300px|thumb|left|</i>Here's the dress made up and pinned to my dummy before adding trim, sleeves and eyelets for lacing<i>]] | |||
For the front closure, I left the front seam open to about 8 inches lower than my waist, then set eyelet in with eyelet pliars at 1 inch intervals, following the pattern for [http://www.festiveattyre.com/p/the-zen-of-spiral-lacing.html spiral lacing]. 58 eyelets later came the arduous task of oversewing them all with embroidery thread - partly for the look of the thing, and partly because it makes it damn near impossible for the eyelets to pull out in use. Then, inspired by the kit guide written for Cabot's Company, a group with astonishingly high kit standards, I [http://www.thelucet.co.uk/index.htm luceted] a long cord out of some brown knitting wool to lace up the front. | |||
[[File:Frock1.jpg|300px|thumb|left]] | |||
The sleeves I made separately, basically by using the sleeve bit from [http://empire.crew.profounddecisions.co.uk/empire-wiki/How_to_adapt_a_commercial_pattern_to_make_a_high_status_dress this] pattern which I've used before, and lining it in the same cotton calico as the dress. I then can tuck it up under the sleeve of the dress, stick a pin through all layers at the shoulder and have long sleeves when I want them, and short sleeves for working or in hot weather. | |||
===Cloak=== | |||
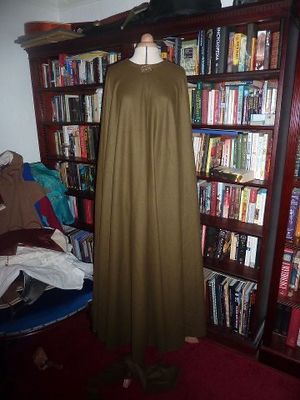
I found drab khaki coloured wool melton on eBay for £5 per metre, so bought 6m to make a full circle cloak. I used the full width of the fabric and ended up with a wonderful, floor length, soft, drapy cloak that looked sensational. Unfortunately I had the revelation that it would be the worst idea in the world to wear it in a potentially soggy field, so I chopped it off to mid calf length. On the up side, I had enough left over for a winged hood, lined in the remnants from my sleeves. | |||
[[File:Frock2.jpg|300px|thumb|left]] | |||
</i> | |||
===Smock=== | |||
I cut up an old brown bedsheet to make a smock, using the T tunic pattern on the wiki. Nice cool underlayer for the hot days, and the fact that the bedsheet had been washed about a million times makes it lovely and soft. | |||
==Finished!== | |||
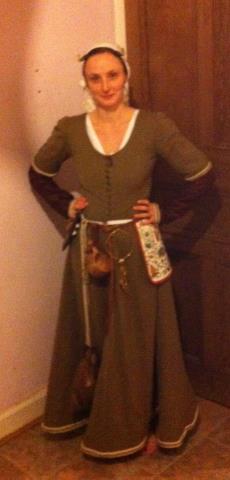
[[File:Annis.jpg|300px|thumb|left|This is me posing - I'm pleased with it!]] | |||
Latest revision as of 15:49, 12 January 2022
Costume Design for Larp
Getting the right costume can be a crucial part of developing your character - not all of us have the luxury of commissioning a complete outfit from scratch, and assembling a new look from a mix of old and new kit can be a real challenge. Here's how I generally go about designing and assembling costume, using my work-in-progress Marcher musician as an example as I go.
Part 1 - Design and Planning
What sort of person is my character going to be?
Here's where you try and get a basic idea of the person you're going to portray. Are they rich or poor? Practical or fanciful? What do they like and dislike? What elements of the brief am I going to pick up on here?
One of the fun things I liked about the Marches brief is its practicality - it's not that the people aren't well off, it's just that they see no reason to squander money on fripperies - in fact, there's a real reverse snobbery that I thought I could pick up on. I want this outfit to be understated and very plain, for the most part, with a few little details that make it stand out. I'm going to use a palette of mostly browns, greys and creams, with a few touches of brass and gold here and there.
What IC and OOC practical considerations do I need to take into account?
Most outfits need a pouch to carry your IC money; it's helpful to have another pouch or a hidden pocket to keep your OOC essentials, such as OOC money and spirit gum for running makeup repairs. You can set yourself a budget here if you like...!
I'm considering using facial prosthetics for this character, so the neckholes are going to have to be reasonably wide to accomodate potential horns, and I might need to consider lacing down the front. I'll tuck the skirts up when it's muddy.
I also really, really hate getting cold at events, so I want lots of layers that I can pile on at night.
What images from the media appeal to me that might help me with my design?
Have a look at the internet - it's full of pictures from films and TV that might help you get an idea of how you might want your outfit to look. You don't have to copy them, but forming a mini "mood board" can help you get an idea of what you might like your costume to look like.
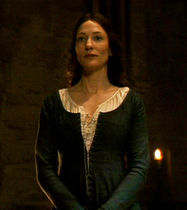
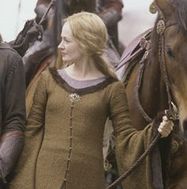
The look of Marian in the recent Robin Hood film, Lady Stark in Game of Thrones and Eowyn in Lord of the Rings all appeal to me - that slightly worn, grimy practicality was something I really wanted to get across in my costume. I also like the layers of the toning colours in these costumes - while I'm not going to copy any of them exactly, I like the colour palette and the general style.
Ready to scribble?
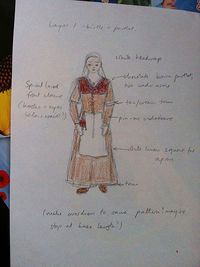
You don't need to be a great artist to draw a quick sketch, and you don't need to show it to anyone but yourself! If you find it difficult to get the proportions of figures right, [this] webpage has templates you can print out and trace, then sketch the rough lines of your costume out over the top.
Terrible, isn't it? Wax crayons clearly aren't my medium. However, you can make out the rough outlines of the design - a white headscarf, an ankle length dress with apron and front lacing, a belt, elbow length sleeves and a darker brown shoulder cover/partlet (which I'm not altogether convinced by, on looking at it, but it can be added or not at the end.) I think I might also add a very similar overdress/kirtle, but I'm confident enough that it'll look ok that I don't feel the need to draw another layer - though I might before the end.
Breakdown - Layer by layer
So, I'm now fairly confident that I know what I want my outfit to look like. Layer by layer, I'm going to wear:
- a white cotton or linen long sleeved smock (I have a short sleeved one that'll do at a pinch). I might make a couple of these as they'll get pretty sweaty in use, and it'd be nice to have a fresh one each day at the event. They also keep my outer layers from getting stinky.
- a brown wool kirtle. I think I'll line this, for neatness and durability, but I'll use lightweight cotton for the lining to stop it being too hot. Elbow length sleeves and pin-on ones for cold nights.
- a slightly different shade of brown wool over-kirtle - I'll make this one a bit baggier and not bother with a front closure. This may cause problems if I have outsize horns, but I think two layers of centre front lacing, one over the other, might be a bit clumsy. I'll line this in wool for warmth, I think.
- I'm considering a dark brown wool cloak, possibly lined in polar fleece, with fur trim around the collar.
- A pair of short hose (possibly in red wool)
- Belt, with accessories
- Headscarf and apron, possibly a hood as well, but I'll come to that at the end (and once I've decided on horns/no horns)
What have I got already?
You can have a look through your kit stash and see if there's anything you can use - in fact, sometimes you can base a whole costume around a really great bit of kit that you have already. What do I need? Always worth a rummage in your local charity shop.
Accessories
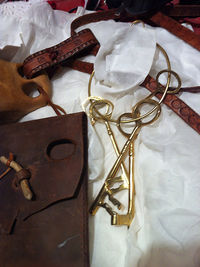
Despite having a huge pile of junk in my house, this costume is much more understated than the kind I usually go for, so I'm a bit worried that I won't have anything that'll work. However, a quick rummage shows up a wooden cup, a brown leather belt, a pouch and a big ring of brass keys, which all work with the look I'm going for. With this costume in mind, I also picked up a couple of linen tablemat type things from Oxfam for the princely sum of £2 and £4, which will be my apron and headscarf. I've got my medieval boots, which I might dye or beeswax to a co-ordinating colour (but I'll save that for the end). I also have my trusty coyote fur, which I got from House of DeClifford and which is presently on a different cloak.
Fabric and materials
I've got three metres of some heavyweight homespun looking wool (charity shop, £10), which will do nicely for the overkirtle. I've also got about 8m of cotton calico leftover from other projects which will line the kirtle nicely. Brown thread, check. Packet of eyelets for the front, check.
So what do I need?
Fabric
For the kirtle, I'll need 3m of wool -- a quick call to [Ceolred Monger] furnished me with 8m of lovely brown wool herringbone (£5 per metre)- lightweight and with a great stretch across the bias. Why 8m I hear you ask? Well, the first three metres is for making into my dress. The second 5m is for lining the overkirtle for coziness, but I want to machine wash it (and dye it) so that it felts up, and you lose a lot of length doing that. (2 packets of Dylon later, and it's a subtly different brown, but it does look like a different fabric, which I wanted - I don't want to be too "matchy" across the layers).
If I make the cloak, I'll need between 3 and 6 metres of heavy wool coating in brown, and possibly the same amount of polar fleece. Yes, it's not an historically accurate fabric, but like I said, I really, really hate being cold at events, and nothing compares to a polar fleece lining for staying warm.
Part 2- Making it
When it comes to making your gear, you'll have to decide whether to use patterns or not. For the early medieval period, lots and lots of garments were constructed out of squares and triangles, and with a measuring tape and a sense of adventure you can make tunics, trousers, cloaks and surcotes without needing a pattern. For more fitted garments, either for a later period or for more fantasy inspired creations, patterns can go a long way towards making your job a lot easier.
Sewing with Commerical Patterns
Commercial patterns are readily available online and in sewing shops, and have the advantage of being generally quite simple to follow, well illustrated and fairly clearly explained. Some of them can be a bit 'costumey', in the sense that they'll make something that's all right to wear once or twice to a party, but might prove uncomfortable or flimsy with repeated use. I prefer my kit to be more durable and feel like something that my character could wear day-to-day (or at least regularly), so a bit of careful selection is needed when choosing a pattern like this. Many brands, such as Simplicity, McCall'sButterick and Burda have specific lines dedicated to costuming for cosplay and Renaissance faires which can be very handy. Be warned though -these patterns run very large, and assume that you're 5 ft 6 and (if a woman) a B cup, so you might well want to make a trial run in cheap sheeting before you cut your expensive fabric. The sizes they use are not the same as "ready to wear clothes", so always measure yourself and get the size that corresponds to your measurements. You might also want to consider changing a zip (if the pattern calls for it) for lacing - partly because it looks more "coolthentic" in many cases, but partly because zips can catch or jam in a field, rendering the whole garment unwearable - disastrous if you haven't brought a spare.
Finally - a word of caution - these companies have a pretty wide definition of what counts as medieval. Don't trust their research - decide what you want to look like and find a pattern to match.
Specialist Historical Patterns
By contrast, specialist historical patterns by the likes of Reconstructing History or Authentic Patterns are usually brilliantly researched and period appropriate. They might not be as easy, though, might need you to use more specialist sewing techniques and sometimes the pattern pieces don't fit together very intuitively. They may also be shaped to fit a body moulded by foundation garments of the period (which you can usually get a pattern for, you just need to build your costume from the body out). You won't usually have to adapt them much, though, and if you're a reasonably confident sewer they can be a brilliant starting point. They are usually a bit more expensive than commercial ones, but are printed on thick paper rather than tissue, which makes them very re-usable. You won't generally get them in sewing shops, though, so you'll have to get them online or at re-enactment fairs.
Pattern Books
If you're going to be doing a lot of sewing, getting a few books with scalable patterns can be a good investment. The Medieval Tailor's Assistant is a fantastic book which I heartily recommend to anyone interested in making their own costume, and available on Amazon amongst other places. There's nothing to stop even a beginner using the techniques described - it looks daunting at first but everything is broken down step by step, so if you're feeling brave jump in and see how you get on.
Kirtle
I drafted my own pattern for the kirtle, partly using the techinque described in The Medieval Tailor's Assistant. It consists of four pieces for the body, and two elbow length sleeve pieces. Because I was machine sewing, though, I used a victorian technique for the lining which is described here- it's a bit tricky to get your head round at first, but once you get going it works very well. Given that it was the first time I'd tried it, I'm very, very pleased with the results - the lining matches perfectly and is secured at every seam. I then lined the sleeves separately, and faced the neckline and the hem by hand using bias strips cut from the wool.
For the front closure, I left the front seam open to about 8 inches lower than my waist, then set eyelet in with eyelet pliars at 1 inch intervals, following the pattern for spiral lacing. 58 eyelets later came the arduous task of oversewing them all with embroidery thread - partly for the look of the thing, and partly because it makes it damn near impossible for the eyelets to pull out in use. Then, inspired by the kit guide written for Cabot's Company, a group with astonishingly high kit standards, I luceted a long cord out of some brown knitting wool to lace up the front.
The sleeves I made separately, basically by using the sleeve bit from this pattern which I've used before, and lining it in the same cotton calico as the dress. I then can tuck it up under the sleeve of the dress, stick a pin through all layers at the shoulder and have long sleeves when I want them, and short sleeves for working or in hot weather.
Cloak
I found drab khaki coloured wool melton on eBay for £5 per metre, so bought 6m to make a full circle cloak. I used the full width of the fabric and ended up with a wonderful, floor length, soft, drapy cloak that looked sensational. Unfortunately I had the revelation that it would be the worst idea in the world to wear it in a potentially soggy field, so I chopped it off to mid calf length. On the up side, I had enough left over for a winged hood, lined in the remnants from my sleeves.
Smock
I cut up an old brown bedsheet to make a smock, using the T tunic pattern on the wiki. Nice cool underlayer for the hot days, and the fact that the bedsheet had been washed about a million times makes it lovely and soft.

