How to - Make a kirtle
How to make a Kirtle
What's a kirtle, I hear you ask? Well, it's a term used to describe a close fitting dress or underdress, worn through a lot of the middle ages. The one we're going to make today is roughly based on the ones they were wearing in the 15th century, and it's a lovely comfortable and practical garment that's cool in summer and works as a great underlayer in winter. This one is sleeveless but you could add sleeves, or make a separate pair and lace or pin them on for a different look.
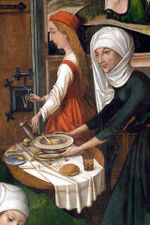
If you're part of the Marcher Authenticity Brigade (of which I'm a fully paid up obsessional member) you'll be pleased to see these historical images of women wearing sleeveless kirtles just like the ones we're going to make. In late 15th century art you see women painted in domestic situations in just this kind of sleeveless kirtle, particularly in pictures about births. For everyone else, they do look cool, don't they?
You will need
- 3m of cotton, linen or lightweight wool, 60 inches wide (if you're making a particoloured dress like mine get 1.5m of each) (I used linen look cotton at £5 per metre - you could use ikea coloured cotton at £3 per metre if you wanted something cheaper - £15)
- 3m of cotton lining (Bomull from ikea is great - £1.75 per metre for unbleached calico) (£5.25)
- Thread in a matching or darker colour. (TIP: if you think you might dye the garment later, get cotton or silk thread. Normal sewing thread won't dye and you'll end up with visible stitching. Coats cotton thread is very good. Guterman quilting cotton thread is too coarse.) (£1)
- A tape measure
- A pen, soft pencil or chalk
- A packet of eyelets (£4)
- 2-3 metres of ribbon, cotton tape or cord (£1)
- An iron
Total cost - £26.25
The Basic Process
What we're going to do is draw a simple pattern consisting of two back and two fronts based on your body measurements. We'll then assemble the lining and the outer fabric step by step, with no visible machine stitching or need for hand finishing except for the bottom hem which you can choose to finish by machine or by hand depending on your preference. There are quite a few steps to the process but none of them is hard, and by taking it a bite at a time even a beginner can make a success of the project.
Making your pattern
These are the two pattern pieces that you're going to map out. As written you'll get a pattern for a close-fitting, supportive dress with little or no ease - if you're anxious about the fit or want a looser kirtle then add a couple of inches to the seam allowances at the sides, and pin it to check the fit and adjust before you start sewing.
Key to measurements
- a)nape of neck to waist + 1/2 an inch. Point z is 2 inches below this line.
- b)base of neck to shoulder - point x should be about 1 inch higher than point y so the shoulder line slopes nicely.
- c)1/2 inch + 1/2 of the distance between your shoulders measured behind your head
- d)1 inch + 1/4 of your underbust measurement
- e) 1 inch + 1/4 of your waist measurement
- f) waist to armpit measurement (get the tape right into your armpit!)
- g) waist to ankle + 2 inches
- h) nipple level to waist, measured straight down your side (don't measure down the curve of your breast)
- i) underbust level to waist, measured straight down your side
- j) 1 inch + 1/2 x (bust measurement - 1/2 your underbust measurement)
- k) 1 inch + 1/4 of your underbust measurement
The straight line and the dotted line down the front piece show two alternative cutting lines for the front skirt. If you're not very curvy (like me) it's can look nice to have a relatively straight front to this. Alternatively if you want more volume in the skirts or have more of a difference between your waist and hip measurements you can flare it along this seam line too. If you want lots more volume in your skirts you could add triangular gores of fabric down the lines marked g.
Cutting out your pieces
Fold your lining fabric in half across the way, selvedge to selvedge. You can either scale your pattern up on pattern paper or newspaper then lay it on, or draw it directly on to your fabric - either works. The picture below shows roughly how you can arrange them - depending on your size you might get a more efficient layout than I have. If you're experienced and happy to play around with it you can waste less fabric if you cut gores to give the skirts more width - you can even add them to this pattern out of your leftover scraps if you want.
You can see from the faint lines in the picture below how the back looks drawn directly on to the fabric.
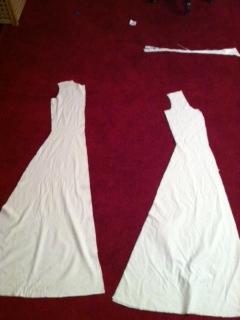
And now cut them out - you should have two front, and two back pieces of lining as below.
Next you can use your lining pieces as a pattern for cutting out your outer fabric - cut them on the fold exactly as above.
Sewing it up
If you have a preferred way of assembling garments then do it whichever way suits you! Here follows a step by step walkthrough for one way of many to do it.
Very important! The difference between a good outcome and a great one is pressing your seams as you go along.
Set your iron up now beside your sewing table. Every time you sew a seam, press it open. You can sew a few then press them in batches to save time if you like, but don't sew across a seam before you've pressed it. Promise me!
- Sew the two back pieces of the lining together down the centre back seam. Press the seam open. Sew the fronts to the backs at the shoulder seams. Press the seams open. Repeat for the outer.
- Next, lay your lining on top of your outer, right side to right side, matching seams and shapes. Make a mark or notch on both sides of the centre front about six inches below your waist.
- Pin the two layers together around both armholes, and starting at the mark or notch you just made, pin them together up the centre front on one side, all the way round the neck and down the other side of the centre front until you reach the mark or notch again.
- Stitch along your pin line around both armholes, and from the notch or mark to the matching one on the other side as you just pinned them.
- Now clip your curves. This means cutting little v shaped notches out of your seam allowance, almost to your stitching line, which allows the fabric to curve neatly when you turn it the right way out.
- Now, pull the fronts through the shoulder straps to turn them the right way out. Suddenly this should start looking a lot like a finished project!
Press the front edge, neck edge and armholes.
- Next you're going to sew up the side seams. The easiest way of doing this is finding the seam at either end of the armhole where the outer and lining are sewn together, matching the two seams together and putting a pin in at the point with the right sides together . You should then be able to match the lining front to the lining back down the side seam, and the outer front to the outer back down the side seam, and if you pin them together you can start at the lining hem and sew all the way up to the armhole and all the way down to the hem of the outer fabric. Do this on both sides.
- You then need to do something similar to match the centre front seams at your notches. Where your stitching lines end on both sides, open the two layers out at the seam and again put at pin in at the join with the right sides together. You can then match the right sides of the outer fabric, and the right sides of the lining. This time it's easier to sew from the "crotch" seam all the way down to the hem, first on the outer, then on the lining.
- Phew! Got that? Ok, now look at your dress and be very proud. You have basically constructed your garment.
- Now let it hang, ideally overnight on a hanger or a dressmaker's dummy. You can now pin both layers together around the hem and hem it up by your preferred method - I like to sew bias tape to the hem, press it up and slipstitch the bias tape to the lining by hand. You may prefer to use the machine!
Lacing up the front
To look really historical, I recommend spiral lacing. This involves slightly offsetting your eyelets so that the top and bottom match perfectly, but the rest don't, so that when you're lacing up the cord runs up in a spiral. It holds the edges together very nicely. Of course, if you prefer the criss-cross look (like a shoelace!) then just space your eyelets evenly. Either way I like them with a one inch gap.
- Make holes - the safest way to do these is to puncture the fabric with an awl, then widen the hole out with a knitting needle - this pushes the fibres apart rather than cutting them and will make your eyelets more durable. I'm a glutton for punishment and I'll be oversewing my eyelets, so I just punched holes.
- Following the manufacturer's directions, put your eyelets in. I recommend 2 part eyelets (the ones that come with a washer) for durability.
- Now add your ribbon, tape or cord to lace it up the front, and you're done!
Wearing it
Wear it over a white shift or blouse, and this will look bloody amazing!
What now?
Got an extra £1?
Buy yourself an extra 1/2m of Bomull cotton and make yourself an apron by cutting a rectangle about 14 inches wide by 36cm long, hemming it and sewing the top edge to a bit of cotton tape to act as a waistband for instant workwear.
Got an extra £2 and like handsewing?
Buy two skeins of embroidery thread and oversew your eyelets. Not only will you please the Marcher Authenticity Brigade, you'll make your eyelets a lot more durable. And it looks nice too.
Got an extra £5? Make Harry happy by making some headwear
Buy 1m of nice wool and use the pattern on this page under the heading "Cynthia's version" to make yourself an open hood. Tie some leftover lining round your head like a headscarf, pop your hood on top and you'll look great.
Got an extra £20 and want something really useful and special?
Order yourself a medieval belt in a colour of your choice, like one of these. Tie round waist with the end dangling down and feel brilliant.
Hungry for more?
Why not use the How to - Make a simple tunic tutorial to make a shift to go under it - if you get an extra 2m of ikea bomull cotton it makes a great lightweight underlayer and you're still under £30!


