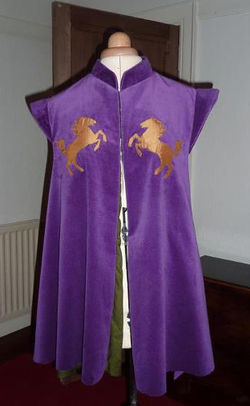
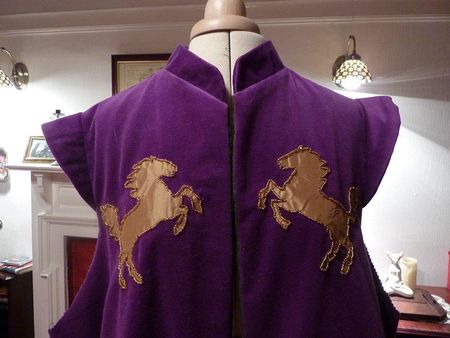
Civil Service Look and Feel
A guide to making the civil service uniforms
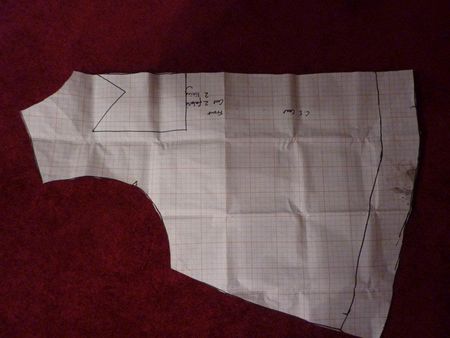
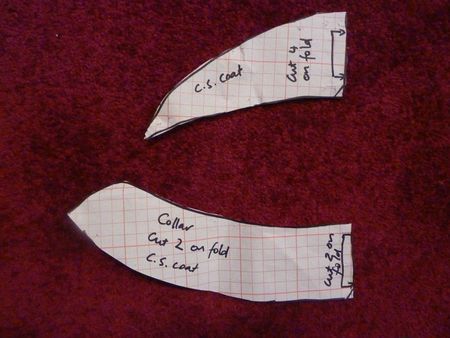
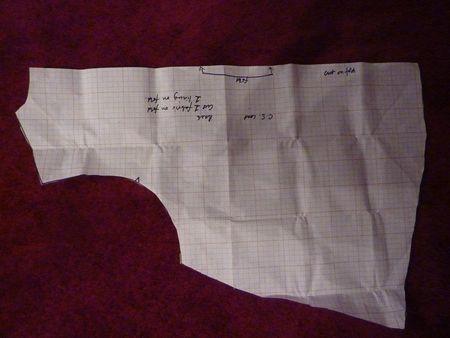
These pattern pieces are drawn on standard 1cm grid pattern paper.
Materials
- 2m purple cotton velvet, width no less than 110cm. An appropriate fabric is here.
- 2m dark olive green cotton
- 30cm heavy iron on interfacing
- 1x frog fastener
1. Cut out pattern pieces from velvet - 2 fronts, 1x back on fold, 4x sleeve caps on fold, 2x collar. Cut 2x fronts and 2x backs from lining.
2. Fuse interfacing to one collar piece and two of sleeve caps
3. Follow instructions below to applique design.
4. Sew velvet fronts to back at shoulder seams. Press seams open. Stay stich 3/8 in from neck edge and clip at intervals to stitching line. Repeat with lining.
5. Sew two collar pieces right side to right side. Clip curves. Turn the right way out and press. Tack along lower edge to hold in place.
6. With right side to right side, pin collar piece to neck edge, easing to fit, leaving 3/8in of garment front free as seam allowance at left and right front. Sew. Pin lining onto other side, sandwiching collar between lining and velvet, and stitch along previous stitching line again. Stitch lining to velvet down both fronts, being careful not to catch the edge of the collar in stitching line.
7. Sew long convex edge of sleeve caps right side to right side, using one interfaced piece per side. Clip curves and turn, tack along free edge as per collar. Matching centre to shoulder seam, sew right side to right side to velvet.
8. Sew side seams of velvet and lining.
9. Continuing from stitching at bottom left and right front, sew lining to velvet, right side to right side around bottom hem, leaving small gap to turn at centre back. Clip curves and turn, press. Slipstitch gap closed by hand.
10. Staystitch 3/8 inch from armscye, lining and velvet. Clip to stitching at intervals. Turn raw edges towards each other, pin and slipstitch velvet to lining around bother armscyes, concealing raw edge of sleeve caps.
The Applique
You will need:
- The fronts of the coat
- Gold taffeta
- Gold/brown thread
- Machine set to zig zag
- Quilters fusible web - Wonder-under, heat-n-bond, fuse-a-web or similar
- Gold seed beads (I use Guterman)
- Beading or sharp needle
1. Trace both horses onto the heat-n-bond. Some brands will tell you which side to use, others not. If it's not clear, very gently separate the layers at one corner. The paper will adhere more to one side of the web than the other - use the MORE adherent side to draw on.
2. Once you've copied them, roughly cut out a square around each design.
3. Carefully peel the less sticky paper from the web. Your design side should still be attached to the web.
4. Press the sticky side of your fusible web to the WRONG side of the taffeta fabric. This should stick pretty well.
5. Carefully using nail scissors cut around your designs. You should now have two horses with a paper patch stuck to one side.
6. Peel off the remaining paper, giving you two sticky fabric horses.
7. Stick them to your garment fronts, trying to keep them symmetrical as per the illustration.
8. Using a dishtowel or pressing cloth to sit between the garment and your iron, press several times briefly with a hot steam iron. This should stick the design to the fabric.
9.Using a narrow zig zag on your sewing machine, topstich the edges of the horse to the fabric. This is fiddly, so take your time.
10. Finally, using your gold coloured thread, couch beads around the design, covering your machine stitching. Thread two needles and knot them - bring from wrong side to right side. String beads onto one and use the other to couch the beady string down, trying to get it to look like a seamless string of beads around the design. Do this all the way around both horses. Bring both needles to the back and secure. Finished!
Some fusible webs don't have paper on both sides - this is ok. Just trace onto the one side of paper that you have, then, when it comes to sticking it to the fabric, lay it in position and give it a quick press with a hot steam iron - not too long but a second or so should be enough to stick it. The rest is the same.
